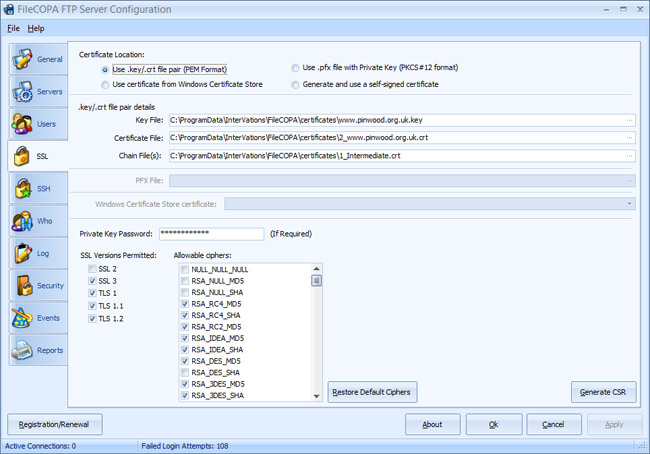
| SSL |
  
|
| SSL |
|
Secure Socket Layer provides secure, encrypted access between an FTP client and FileCOPA FTP Server.
NOTE that FileCOPA is not susceptible to the heartbleed vulnerability as it does not use OpenSSL code. However ALL SSLv3 servers are vulnerable to the Poodle attack as it is a weakness with SSLv3 itself.
To make your server fully secure you should restore the default ciphers and disable SSLv2 & SSLv3 and enable TLSv1, TLSv1.1 and TLSv1.2.
A Public/Private Key pair is used for encrypt communications between client and server, so that they cannot be understood by anyone else. The public key is open to anyone, the private key is only known to the server.
For technical reasons, you are restricted to using only one certificate.
Certificates can be obtained from commercial organisations such as Verisign, Globalsign , InstantSSL and FreeSSL. FreeSSL and InstantSSL will allow you to get a SSL certificate free to try for 30 days.
A free certificate is also available from StartCom Free SSL Certification Authority, which has been successfully tested with FileCOPA, as well as InstantSSL.
FileCOPA uses the same .key/.crt file pairs as does the Apache Web Server. If you already have a certificate for your secure Apache server then you can use this same file pair for FileCOPA.
FileCOPA has three ways of using certificates:
•Using a certificate as a .key/.crt file pair obtained from a certificate provider.
•Using a certificate obtained from a certificate provider that has been installed into your Windows Certificate Store.
•Use a PFX file - PKCS #12 is a successor to Microsoft's PFX A single file can contain certificates, root authority certificates, certificate chains and private keys, with individual parts encrypted. This enables the exchange of cryptographic information in a single file.
•FileCOPA will generate a self-signed certificate for you - this is the simplest option.
If you obtain a certificate from a trusted provider, such as Verisign, Thawte etc (who will make identity checks), then this will show that users are definitely connected to your server, not another posing as yours. Free and self-signed certificates will not establish beyond doubt that this is your server, but will nevertheless facilitate a secure connection between users and the servers.
Below are instructions for creating and installing a certificate, but also see the image below.
NOTE - if you wish to use secure connections you also need to enable the relevant servers on the Servers page.
1.Check the radio button Use .key/.crt file pair
2.Press the Generate CSR button
3.Enter the details for your server in the five fields.
4.A Certificate Signing Request is generated - this is an encrypted block of data that contains the name of the server you wish to use the certificate on, your business name and your physical location - this is usually required by the Certificate Provider. A corresponding Key File will be generated when you do this, which you should retain.
5.Press the Copy to Clipboard button (and perhaps paste into a text editor & save as a file for safety).
6.Now go to the web site of your chosen Certificate Provider and follow their procedure (the details of these will vary). You will reach a point where they will ask you to put your CSR into a text box - assuming it is still on your clipboard, you can simply paste it in. You will finally be provided with your certificate, which you should copy to the clipboard (and again maybe put into a text file for safety).
7.Now use the Paste from clipboard button and a Certificate File will be generated. Alternatively you can paste the certificate into a text file, save it and then use the browse button at the right of the Certificate File field below to locate it.
8.Press the Apply button.
Using a Certificate from the Windows Certificate Store
•Check this option, and the listbox Windows Certificate Store certificate will be enabled.
•Select your certificate - if none are shown, you do not have any.
•Press the Apply button
Please also see the notes below.
Generate and use a self-signed certificate
•Check the radio button Generate and use a self-signed certificate
•Press the Apply button.
•That's it ! FileCOPA will do the job for you.
Notes for SSL Windows Certificate Store
In order for FileCOPA to use certificates from the Windows Certificate Store the following must be true. The certificate must have a private key. The certificate must be enabled for ServerAuthentication. The certificate must be valid. The certificate must be in the Other People store of the LOCAL COMPUTER. Note that by default Windows only shows you your own certificates (Current User), to view the LOCAL COMPUTER certificates you need to do the following - run the Microsoft Management Console (mmc.exe). Go to File->Add/Remove Snap In. Click Certificates ->Add. Select Computer Account and press next. Click finish. Click OK.